NGINX Ingress Controller(NIC) 環境のセットアップ
1. 環境セットアップ
UDFのWEB SHELLを使用する場合は以下を実行ください。
su ubuntu
ファイルを取得します
cd ~/
git clone https://github.com/nginxinc/kubernetes-ingress/ --branch v3.1.1
cd ~/kubernetes-ingress
ライセンスファイルをコピーしてください ファイルが配置されていない場合、トライアルを申請し証明書と鍵を取得してください なお、SSL証明書および鍵ファイルは以下に配置しています。
JumpBox:C:UsersuserDesktopKey
ubuntu-host1:/home/ubuntu/
cp ~/nginx-repo* .
ls nginx-repo.*
2. コンテナイメージの作成
make debian-image-nap-dos-plus PREFIX=registry.example.com/root/nic/nginxplus-ingress-nap-dos TARGET=container TAG=3.1.1
# Image の Build は数分(約5分)必要となります
docker images | grep nginxplus-ingress-nap-dos
1registry.example.com/root/nic/nginxplus-ingress-nap-dos 3.1.1 9eca3c333eb6 About a minute ago 659MB
Container Image のPushのためにレジストリへログイン
# registry.example.com にログイン
docker login registry.example.com
Username: root       << 左の文字列を入力
Password: password   << 左の文字列を入力
1WARNING! Your password will be stored unencrypted in /home/ubuntu/.docker/config.json.
2Configure a credential helper to remove this warning. See
3https://docs.docker.com/engine/reference/commandline/login/#credentials-store
4
5Login Succeeded
Container Image のPush
docker push registry.example.com/root/nic/nginxplus-ingress-nap-dos:3.1.1
3. NGINX Ingress Controller環境のセットアップ
先程の手順で取得したGitHubのフォルダへ移動し、必要となるリソースをデプロイします。
cd ~/kubernetes-ingress/deployments
# Create RBAC
kubectl apply -f common/ns-and-sa.yaml
kubectl apply -f rbac/rbac.yaml
kubectl apply -f rbac/ap-rbac.yaml
kubectl apply -f rbac/apdos-rbac.yaml
# Create Common resources
kubectl apply -f ../examples/shared-examples/default-server-secret/default-server-secret.yaml
kubectl apply -f common/nginx-config.yaml
kubectl apply -f common/ingress-class.yaml
# Create Custom Resource
kubectl apply -f common/crds/k8s.nginx.org_virtualservers.yaml
kubectl apply -f common/crds/k8s.nginx.org_virtualserverroutes.yaml
kubectl apply -f common/crds/k8s.nginx.org_transportservers.yaml
kubectl apply -f common/crds/k8s.nginx.org_policies.yaml
kubectl apply -f common/crds/k8s.nginx.org_globalconfigurations.yaml
kubectl apply -f common/crds/appprotect.f5.com_aplogconfs.yaml
kubectl apply -f common/crds/appprotect.f5.com_appolicies.yaml
kubectl apply -f common/crds/appprotect.f5.com_apusersigs.yaml
kubectl apply -f common/crds/appprotectdos.f5.com_apdoslogconfs.yaml
kubectl apply -f common/crds/appprotectdos.f5.com_apdospolicy.yaml
kubectl apply -f common/crds/appprotectdos.f5.com_dosprotectedresources.yaml
4. NGINX App Protect Dosで利用するArbitratorを実行
Deploymentの内容を確認
deployment/appprotect-dos-arb.yaml の内容を確認します。
 1kind: Deployment
 2metadata:
 3  name: appprotect-dos-arb
 4  namespace: nginx-ingress
 5spec:
 6  replicas: 1
 7  selector:
 8    matchLabels:
 9      app: appprotect-dos-arb
10  template:
11    metadata:
12      labels:
13        app: appprotect-dos-arb
14    spec:
15      containers:
16      - name: appprotect-dos-arb
17        image: docker-registry.nginx.com/nap-dos/app_protect_dos_arb:1.1.0
18        imagePullPolicy: IfNotPresent
19        resources:
20          limits:
21            memory: "128Mi"
22            cpu: "500m"
23        ports:
24          - containerPort: 3000
25        securityContext:
26          allowPrivilegeEscalation: false
27          runAsUser: 1001
28          capabilities:
29            drop:
30              - ALL
service/appprotect-dos-arb-svc.yaml の内容を確認します。
 1apiVersion: v1
 2kind: Service
 3metadata:
 4  name: svc-appprotect-dos-arb
 5  namespace: nginx-ingress
 6spec:
 7  selector:
 8    app: appprotect-dos-arb
 9  ports:
10    - name: arb
11      port: 3000
12      protocol: TCP
13      targetPort: 3000
デプロイします。
kubectl apply -f deployment/appprotect-dos-arb.yaml
kubectl apply -f service/appprotect-dos-arb-svc.yaml
デプロイ結果を確認します。
kubectl get deployment -n nginx-ingress
1NAME                 READY   UP-TO-DATE   AVAILABLE   AGE
2appprotect-dos-arb   1/1     1            1           4m32s
kubectl get pod -n nginx-ingress
1NAME                                  READY   STATUS    RESTARTS   AGE
2appprotect-dos-arb-5d89486bbc-pkbrg   1/1     Running   0          4m43s
kubectl get svc -n nginx-ingress
1NAME                     TYPE        CLUSTER-IP   EXTERNAL-IP   PORT(S)    AGE
2svc-appprotect-dos-arb   ClusterIP   None         <none>        3000/TCP   6s
5. NGINX Ingress Controllerの実行
NGINX Ingress Controllerのpodを実行します。DeploymentとDaemonSetによる実行が可能ですが、のこの記事ではDeploymentで実行します。DaemonSetで実行したい場合にはマニュアルを参照して適切に読み替えて進めてください。
argsで指定するパラメータの詳細は Command-line Arguments を参照してください
## cd ~/kubernetes-ingress/deployments
vi deployment/nginx-plus-ingress.yaml
コメントを付与した行を適切な内容に修正してください
 1** 省略 **
 2spec:
 3   serviceAccountName: nginx-ingress
 4   containers:
 5   - image: registry.example.com/root/nic/nginxplus-ingress-nap-dos:3.1.1  # 対象のレジストリを指定してください
 6   imagePullPolicy: IfNotPresent
 7   name: nginx-plus-ingress
 8** 省略 **
 9   args:
10      - -nginx-plus
11      - -nginx-configmaps=$(POD_NAMESPACE)/nginx-config
12      - -default-server-tls-secret=$(POD_NAMESPACE)/default-server-secret
13      - -enable-app-protect                            # App Protect WAFを有効にします
14      - -enable-app-protect-dos                        # App Protect DoSを利用する場合、有効にします
15      - -enable-oidc                                   # (追加) OIDCに必要となるArgsを有効にします
16      - -enable-snippets                               # (追加) OIDCで一部設定を追加するためsnippetsを有効にします
17     #- -v=3 # Enables extensive logging. Useful for troubleshooting.
18     #- -report-ingress-status
19     #- -external-service=nginx-ingress
20     #- -enable-prometheus-metrics
21     #- -enable-service-insight
22     #- -global-configuration=$(POD_NAMESPACE)/nginx-configuration
修正したマニフェストを指定しPodを作成します。
## cd ~/kubernetes-ingress/deployments
kubectl apply -f deployment/nginx-plus-ingress.yaml
1deployment.apps/nginx-ingress created
kubectl get pods --namespace=nginx-ingress | grep nginx-ingress
1nginx-ingress-7f67968b56-d8gf5 1/1 Running 0 3s
kubectl get deployment -n nginx-ingress | grep nginx-ingress
1nginx-ingress 1/1 1 1 2m52s
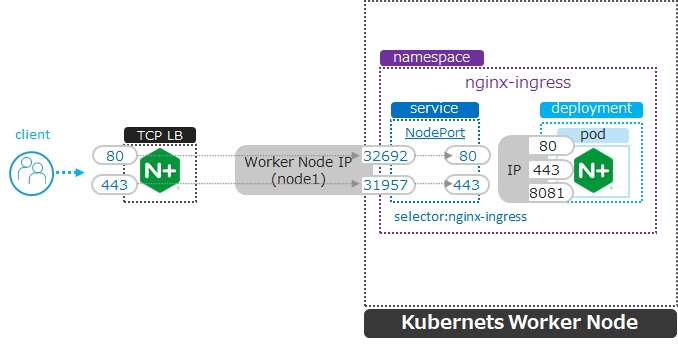
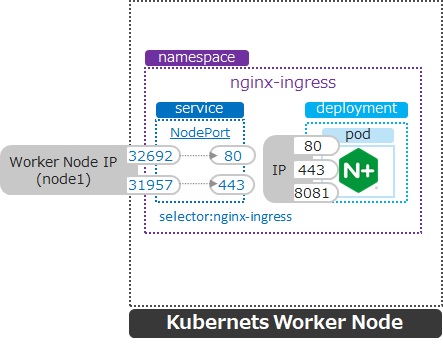
6. NGINX Ingress Controller を外部へ NodePort で公開する
本ラボの環境ではKubernetesへのアクセスを受けるため、NGINX Ingress Controllerを外部へNodePortで公開します。
service/nodeport.yaml の設定内容を確認します。type NodePortでHTTP、HTTPSで待ち受ける設定であることを確認します。
 1apiVersion: v1
 2kind: Service
 3metadata:
 4  name: nginx-ingress
 5  namespace: nginx-ingress
 6spec:
 7  type: NodePort
 8  ports:
 9  - port: 80
10    targetPort: 80
11    protocol: TCP
12    name: http
13  - port: 443
14    targetPort: 443
15    protocol: TCP
16    name: https
17  selector:
18    app: nginx-ingress
NodePortをデプロイします。
## cd ~/kubernetes-ingress/deployments
kubectl apply -f service/nodeport.yaml
1service/nginx-ingress created
kubectl get svc -n nginx-ingress | grep nginx-ingress
1nginx-ingress NodePort 10.108.250.160 <none> 80:32692/TCP,443:31957/TCP 5s
このコマンドを実行した結果、Kubernetes の Worker Nodeでそれぞれのサービスに対しポートが割り当てられています。 図の内容を確認してください。
Note
NGINX Plusをインストールする場合、こちらの手順「 NGINX Plusのインストール (15min)」を参考に、NGINX Plusをインストールしてください。
先程確認したNodePortで割り当てられたポート番号宛に通信を転送するように、NGINXを設定します。
cd ~/
sudo cp /etc/nginx/nginx.conf /etc/nginx/nginx.conf-
cat << EOF > nginx.conf
user  nginx;
worker_processes  auto;

error_log  /var/log/nginx/error.log notice;
pid        /var/run/nginx.pid;


events {
   worker_connections  1024;
}


# TCP/UDP load balancing
#
stream {
   upstream tcp80_backend {
      server node1:32692;    # HTTP(TCP/80)に割り当てられたポート番号
   }
   upstream tcp443_backend {
      server node1:31957;     # HTTPS(TCP/443)に割り当てられたポート番号
   }

   server {
      listen 80;
      proxy_pass tcp80_backend;
   }
   server {
      listen 443;
      proxy_pass tcp443_backend;
   }
}
EOF
sudo cp nginx.conf /etc/nginx/nginx.conf
sudo nginx -s reload
現在の状態は以下となり、サービスを外部に公開する準備が完了しました。